
Die Progress
+3
Reload3006
hawcer
Daywalker
7 posters
Page 1 of 1
![]()
 Die Progress
![]() by Daywalker Wed May 04, 2011 3:25 pm
by Daywalker Wed May 04, 2011 3:25 pm
Well, the new belt for the lathe came in today....

Here are just some pics of the material in each step.
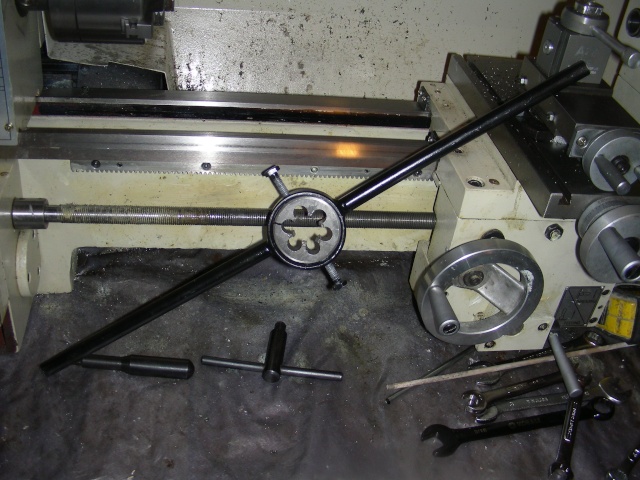
Here I have my threading die installed into a very nice handle made for me by pathfinder here on the site:
Here is the bar stock cut to length waiting to be turned :

Here is a piece of test stock that was too short to use as a die. Well, it was the shortest piece. I have it turned to the diameter to accept the threading die and to practice threading to make sure I have the diameter correct :

Now my plan is to chuck this up into the jaws of the lathe to thread it better. I have stuff that I can use to make sure that the threading die is level to work the piece so that the threads are cut even and straight. More on this as I advance on through...
Here are just some pics of the material in each step.
Here I have my threading die installed into a very nice handle made for me by pathfinder here on the site:
Here is the bar stock cut to length waiting to be turned :
Here is a piece of test stock that was too short to use as a die. Well, it was the shortest piece. I have it turned to the diameter to accept the threading die and to practice threading to make sure I have the diameter correct :
Now my plan is to chuck this up into the jaws of the lathe to thread it better. I have stuff that I can use to make sure that the threading die is level to work the piece so that the threads are cut even and straight. More on this as I advance on through...

Daywalker- Admin

- Posts : 2324
Join date : 2010-10-18
Location : Virginia
![]()
![]()
Re: Die Progress
![]() by hawcer Wed May 04, 2011 4:21 pm
by hawcer Wed May 04, 2011 4:21 pm
Too bad you couldn't thread the dies on the lathe...maybe someday?

hawcer- Mod
- Posts : 1896
Join date : 2010-11-04
Age : 52
![]()
![]()
Re: Die Progress
![]() by Daywalker Wed May 04, 2011 4:41 pm
by Daywalker Wed May 04, 2011 4:41 pm
I will be threading on the lathe. It takes practice so I will practice on other things starting out with nylon and stuff then work my way up. Kinda crawling before I walk. This lathe has the quick change gears, however, I have to learn the gearing. From reading what is in the book that came with the lathe, doesn't seem that too bad, however, after them having the wrong belt size listed, it is kinda hard for me to chew...
Threading like this is just temp and to get me through until I learn to thread on the lathe...
Threading like this is just temp and to get me through until I learn to thread on the lathe...
Daywalker- Admin
- Posts : 2324
Join date : 2010-10-18
Location : Virginia
![]()
![]()
Re: Die Progress
![]() by Reload3006 Wed May 04, 2011 4:44 pm
by Reload3006 Wed May 04, 2011 4:44 pm
even using a die you will want to test your thread fit on a 7/8-14 nut so you know that you are deep enough.

Reload3006- Member

- Posts : 1761
Join date : 2010-11-19
Age : 64
Location : West Plains, Mo. , St. Louis ,Mo.
![]()
![]()
Re: Die Progress
![]() by Pathfinder Wed May 04, 2011 9:15 pm
by Pathfinder Wed May 04, 2011 9:15 pm
Looks good DW. Cant wait to see it in a press. You are on your way now! 

Pathfinder- Member

- Posts : 409
Join date : 2010-10-18
Age : 47
Location : WestWinfield New York
![]()
![]()
Re: Die Progress
![]() by eagle60 Wed May 04, 2011 9:54 pm
by eagle60 Wed May 04, 2011 9:54 pm
The quick change gears are not that bad as long as you have the correct gears. The HF lathes are like that and they had an assortment that came with them. I think mine called for a 40 tooth in the A position, 65 tooth in the B position, any gear in the C position as all it was doing was spacing the B gear to the back, and move the spacer on the D position to the front of a 35 tooth gear if I remember correctly for the 14 tpi. Yours may have a different pitch thread on the lead screw which would change the ratio some. Mine also has an illistration diagram on the side to go by. It is a little time consuming to set the gears up but works well once there. I have to take small bites because the feed is fast and they don't have the best motors in the world for slow speed. While they suggest to match the numbers on the threading dial, I have screwed up several pieces trying, so I resorted to hitting the stop switch when I reached the end of the area I was threading and then putting the switch in reverse to back all the way off the thread. Dial in a couple of thou. and repeat. Like reload said, have a nut handy to know when you have it right and it's all good.Daywalker wrote:I will be threading on the lathe. It takes practice so I will practice on other things starting out with nylon and stuff then work my way up. Kinda crawling before I walk. This lathe has the quick change gears, however, I have to learn the gearing. From reading what is in the book that came with the lathe, doesn't seem that too bad, however, after them having the wrong belt size listed, it is kinda hard for me to chew...
Threading like this is just temp and to get me through until I learn to thread on the lathe...
Yep, Lord willing and the belt don't break, you gonna be making some dies
Last edited by eagle60 on Wed May 04, 2011 11:24 pm; edited 1 time in total

eagle60- Member

- Posts : 971
Join date : 2011-01-02
Location : East Central MS
![]()
![]()
Re: Die Progress
![]() by Reload3006 Wed May 04, 2011 10:26 pm
by Reload3006 Wed May 04, 2011 10:26 pm
tell ya ive been a machinist/ tool and die maker for over 35 years and I still dont have the thread dial down as to what numbers you can use for what threads .. so I just pick a number and stick with it. its really not that bad.
Reload3006- Member
- Posts : 1761
Join date : 2010-11-19
Age : 64
Location : West Plains, Mo. , St. Louis ,Mo.
![]()
![]()
Re: Die Progress
![]() by Reload3006 Thu May 05, 2011 7:36 am
by Reload3006 Thu May 05, 2011 7:36 am
oh I forgot to tell you but your tail stock spindle will align your die for you. Just push it lightly against the die onto the part it will square it up and align it for you as you get your die started.
Reload3006- Member
- Posts : 1761
Join date : 2010-11-19
Age : 64
Location : West Plains, Mo. , St. Louis ,Mo.
![]()
![]()
Re: Die Progress
![]() by dartfreak75 Thu May 05, 2011 8:24 am
by dartfreak75 Thu May 05, 2011 8:24 am
Looking good day I'm glad you finally got your belt

dartfreak75- Member
- Posts : 1182
Join date : 2010-11-21
Age : 39
Location : southwest va
![]()
![]()
Re: Die Progress
![]() by hawcer Thu May 05, 2011 8:43 am
by hawcer Thu May 05, 2011 8:43 am
dartfreak75 wrote:Looking good day I'm glad you finally got your belt
Me too, It has to be hard working with one hand while the other hand is holding your pants up.

I hope that belt will last you this time, so you can keep working steadily with out more unseen interruptions.
hawcer- Mod
- Posts : 1896
Join date : 2010-11-04
Age : 52
![]()
![]()
Re: Die Progress
![]() by Daywalker Thu May 05, 2011 4:14 pm
by Daywalker Thu May 05, 2011 4:14 pm
hawcer wrote:dartfreak75 wrote:Looking good day I'm glad you finally got your belt
Me too, It has to be hard working with one hand while the other hand is holding your pants up.
I hope that belt will last you this time, so you can keep working steadily with out more unseen interruptions.
LOL, yea it is hard working that way.
The other belt would have lasted me if I had not messed up. I still believe that I could have possibly tried to advance the parting tool too fast. I have my metal rulers and stuff now so that I can get right down and do precision measureing to make sure that I am square to the tool. This one should last a many many good while......
Daywalker- Admin
- Posts : 2324
Join date : 2010-10-18
Location : Virginia
![]()
![]()
Re: Die Progress
![]() by Daywalker Fri May 06, 2011 7:42 pm
by Daywalker Fri May 06, 2011 7:42 pm
Ok interesting. I had posted this, hit submit and said it saved, but it seems to have been eatin by the forum Goblins, so here goes again for second time.
OK, so a friend of mine was nice of enough to send me a punch that he had for his .224 swage set. Basically it is a base with the punch held on by a set screw. I kinda like the design which if you was to break the punch, take the set crew out and replace the punch rather than the whole thing.
At anyrate, tonight was my time trying to make a punch like this. Now, between measureing and and looking things over and doing some figureing, my first time too me about an hour. I should get better the more I make.
Also be advised, the Diameter the upper portion of mine is not the same size as his. I did not have the bigger bar stock. I am not sure if that even matters but I will study on it some more. I also need to increase the length of the groove between the upper and bottom portions. My bottome base, I kinda turned it a little smaller by accident. But for the first try, I am very proud of myself.
So here are the pictures. The one on the left belongs to my friend and the one on the right is the one I made.....
Daywalker- Admin
- Posts : 2324
Join date : 2010-10-18
Location : Virginia
![]()
![]()
Reload3006- Member
- Posts : 1761
Join date : 2010-11-19
Age : 64
Location : West Plains, Mo. , St. Louis ,Mo.
![]()
![]()
eagle60- Member
- Posts : 971
Join date : 2011-01-02
Location : East Central MS
![]()
![]()
Re: Die Progress
![]() by Daywalker Sat May 07, 2011 12:10 am
by Daywalker Sat May 07, 2011 12:10 am
Thanks guys, I am gonna make another one tomorrow see if I can get it closer... May even shorten the upper portion a bit....
Daywalker- Admin
- Posts : 2324
Join date : 2010-10-18
Location : Virginia
![]()
![]()
Re: Die Progress
![]() by dartfreak75 Sat May 07, 2011 2:33 am
by dartfreak75 Sat May 07, 2011 2:33 am
that looks good cant wait to see them finished!
dartfreak75- Member
- Posts : 1182
Join date : 2010-11-21
Age : 39
Location : southwest va
![]()
![]()
Re: Die Progress
![]() by kcatto Sat May 07, 2011 4:43 pm
by kcatto Sat May 07, 2011 4:43 pm
Hey tommy your lathe jujitsu is getting awesome.....
you are rocking....
you are rocking....

kcatto- Member
- Posts : 648
Join date : 2010-11-15
Age : 52
Location : Oklahoma
![]()
![]()
![]()
Page 1 of 1
Permissions in this forum:
You cannot reply to topics in this forum|
|
|